

KTM, Husaberg, or Husqvarna Computer Relocation Tutorial
Relocating the OEM computer on KTM/Husaberg/Husqvarna

Regardless of whether you are starting with your stock bars or with Flexx Handlebars already installed the directions are the same. This was a brand new bike so we had to remove the stock bar. There are several locations you can mount the computer in, we prefer off of the back crossbar, or in between the crossbars.
The only items required to move your computer is two 6x1.0 nuts. You'll use your stock computer mount.

Remove the front headlight/number plate so you have easy access to the computer and bracket as well as plenty of room to work with the wires. If you have a headlight you will need to unplug it.

We suggest you number all of the wires before disconnecting them so it’s easier to reconnect them without confusion.

With the wires disconnected, unclip the cable/line guides. Older bikes may not have guides on the computer mount.

Next, unbolt the computer mount from the triple clamp with an 8mm wrench.

Unplug the headlight knob wires, you can leave the headlight knob on the mount. Loosen the knob’s aluminum retaining nut slightly until you can twist the assembly underneath. Depending on how you orientate the mount, and where you place it will dictate which way the bottom of the knob needs to sit.


The top picture is orientated in stock position. The above picture is how you may need to rotate it for wire clearance.

At this point you need to decide where you would like to locate the computer. For the most part we mount them off of the rear crossbar, sometimes using a damper crossbar flipped upside down to drop it lower. Many riders mount the computer in between the crossbars, with some taking it a step further and trimming the pad around the computer.

Mounting the computer in between the crossbars offers a great view of the screen and easy access to the buttons.

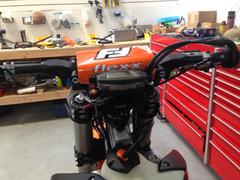
Here is a photo of the computer sitting behind the rear crossbar. In this instance we are using a straight crossbar. This positions the computer to be easily read, with access to the buttons.

Above, we used a damper crossbar flipped upside down to drop the computer lower, ending up about flush with the top of the bar pad. The limiting factor in mounting it this way is the flipped damper crossbar can interfere with the bar mount. If you take a scale or ruler and set it against the inside of the back of your crossbar you should be able to tell if you have the clearance for a flipped damper crossbar.

If you are going to mount the computer off the backside of either crossbar you will need to flip the computer around on the mount. Your fuel lights, knobs or switches can all be rolled to orientate in the correct position but will be on the opposite side.

Once you know where you are going to locate your computer it is time to mark and drill the crossbars. It’s easiest if you locate the bracket where you would like it on the crossbars and use it to mark the holes. You can offset it to one side or the other if you need to create clearance to mount other components. We use a 15/64” drill for the holes.

With the holes drilled it’s time to mount the bracket to the crossbar. If the computer is off of the bracket it is easiest to reattach it before bolting the bracket to the crossbar.You will need 6x1.0 nuts to retain the bolts. Although you could use the stock 6mm mounting bolts we opted for a shorter units so there wasn’t much bolt exposed outside of the nut.

With the computer mounted it's time to reconnect the wires. Before we connect them though we slide a heat shrink wrap over the wires, then connect them. After the wires are connected slide the heat wrap where you would like, covering the connections, and heat it with a heat gun.

With the the wires wrapped up, verify your lines and cables are routed correctly and will not snag or catch on the computer or any other component.


With a little trimming on the back side of the cover you should be able to slide the cover in-between the crossbar and the computer, you should not have to trim the foam.
If you have any questions please email us, we love to help our riders.